Last updated: 3-18-01
go to lesson-1d (3-27-01)
Directions and explanations
Lesson 1c

First, if you have been experiencing any difficulty playing the .wav files within this lesson, go   HERE   for a better understanding of the process required to play these files.

In this portion of the lesson, I'm going to give the flute tablature it's own staff rather than placing it within the staff containing notes and other typical musical symbols. This is how sheet music is usually displayed. After completing this portion of the lesson, you should be able to start putting on paper the songs that you create on your flute, and share them with others. Paper that contains many rows of these lines is readily available at music stores. You will want to ask for staff paper designed for guitar tablature, since that will have the same six lines as I'll be using for the flute tablature. Staff paper for most other instruments contains only 5 lines.

This section of the lesson will also be much more complicated than the previous sections, so you may want to study it over the course of many days.

Look at the graphic below  and notice that the displayed image is the same first and second bar as shown in "lesson-1a". Also notice that there are two staffs. One is for use by another instrument such as a piano and the second is for the flute tablature. The first staff contains the typical notes as most instruments use them. Also notice that there are now two bars on the same line. Music is often written with more than one bar on each line. It's very common to see eight bars on one line. There is no rule as to how many bars can or must be displayed on one line. Also different instruments have their own staffs. In the lessons that follow, I'll display the tablature in this format. Sheet music is often available with guitar tablature included in this type of format except the tablature uses a different style that is specially suited to display the finger placement on the various strings of the guitar.

Notice in the graphic image, that I've included some new symbols, an indication of the key of the flute that the tablature represents, and have also replaced the 5-line staff with a 6-line staff. When using a separate staff for the flute tablature, I'll be using the 6-line staff. For a 5-hole (pentatonic scale) flute the holes will be represented by dots placed within the empty spaces between the lines of the staff. When the tablature is for a 6-hole flute, the holes will be represented by each line of the staff. The key indicator will be followed by a number indicating the number of holes in the flute.

Okay, notice that the "key" represented here is the key of "E". What that means is that the notes represented, if played with a flute in the key of "E" will be played accurately as shown. For example if a piano or other instruments plays the notes shown on the first staff, and you play the notes indicated by the tablature using a flute in the key of "E", you will both sound the same. However if you use a flute in the key of, for example "F", you won't sound the same, since the piano will play the first note as a "B" and you would be playing the first note on your F-flute (with the fingering shown) as a "C". However, if you play alone with no other instruments, you will sound perfectly fine.

Before moving on, I'm going to discuss the subject of playing your flute with other flutes (or instruments) in different keys. In order to do this, I'm going to have to show you the 12 notes in the scale known as the "chromatic scale". If you will never be playing with instruments in other keys and/or have no interest in learning any "music theory", you will not need to learn or even record this information. If you will be playing with instruments in other keys, this information will be very valuable to you. Go  HERE  to get a crash course in music theory as it relates to the E-minor pentatonic scale.

Now for a discussion of the new symbols. Notice that there is a small dot over the second note. This dot means that you give this note a little more emphasize than the other notes. You also hold it for a shorter time than you ordinarily would. For example you could count it as 3/8 of a beat and add a rest period of the remaining 1/8 count before starting the next note. However you do it, make an attempt to emphasize it as I've done in the sample .wav file. Next notice that their is a straight line that goes from the first note in the second bar to the second note in that same bar. That means that you continue to blow into the flute while you make the second note. This can also be represented by a curved line in place of the straight line. The straight line is easier for me to create with my graphic software so that is the method I'll use in this lesson. The connecting of notes is known as a "slur". If there is no "slur", then you make each note separately by using your tongue to start each breath into the flute. That method is known as "tonguing" and is similiar to making the sound "ta" with each breath into the flute. Instead of "tonguing" the notes, you can also just blow each one separately with a new breath. Just make sure that you don't connect notes of the same breath unless there is a "slur" connecting them. Those of you who have observed that there seems to be an extra note (and extra slur) in the musical notation above the flute tablature, can go  HERE  to find out why. If there is a dot over the note as explained above, then you must "tongue" the note in order to give it the proper emphasize. Take notice that the way these bars are now counted has changed. As the numbers below the notes indicate, the second note of the first bar now gets only 1/2 beat, and the note that follows it, makes up for the loss of that 1/2 beat by adding it to itself making 2-1/2 beats. The first note of the second bar now gets only 1/2 beat. I've added a new symbol to the number representing the count for the second note of the second bar. I've placed a "period" after the number. That indicates that the count is actually to be half-again the number indicated. In this case it would be 1-1/2 beats. That makes it a little easier than writing it out and is similar to the way such a beat would be indicated in normal musical notation.


First two measures of Largo (from Symphony No. 9) arrangement
back to top

Hear it
File size: 0.46 meg (458k)


Pentatonic scale
Some music theory as it relates to the
5-hole Native American style flute
 

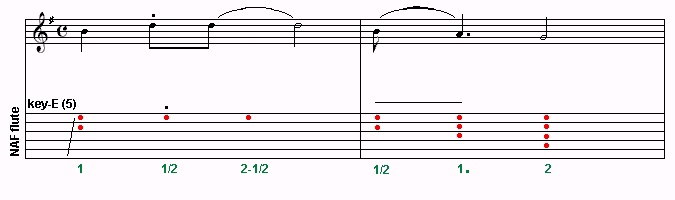
A Native American style flute with 5 holes, in the key of E, has the notes arranged in the E-minor pentatonic scale format. That scale is a subset of a scale (natural E-minor diatonic scale) which is itself a subset of a scale known as the chromatic scale. The natural E-minor diatonic scale is often just referred to as the E-minor scale. Those of you with some music theory background, may also like to know that the natural E-minor diatonic scale uses the same notes as the G-Major diatonic scale

The notes of the chromatic scale beginning with E are:

E, F, F#, G, G#, A, A#, B, C, C#, D, D#, and then back to E

The "#"  symbol means sharp. Notice that each note except E and B have a sharp. Okay, this is where it gets a little bit complicated so read slowly. There are many subsets of the chromatic scale, and even subsets of the subsets. It's important to rember that the E-minor pentatonic scale is a subset of the E-minor scale, which is a subset of the chromatic scale. The E-minor scale contains the following notes:

E, F#, G, A, B, C, D

This scale follows a specific pattern of  "steps".  In the chromatic scale above, the distance between each note is known as a "1/2 step". The minor scale always consists of the following pattern of whole/half steps:

WHOLE - HALF - WHOLE - WHOLE - HALF - WHOLE - WHOLE

showing this for the key of E, it looks like this:

E <whole> F# <half> G <whole> A <whole> B <half> C <whole> D <whole> E

or if a picture is worth a thousand words:

E
F
whole step
skip note
F#
G
G#
whole step
skip note
A
A#
whole step
skip note
B
C
C#
whole step
skip note
D
D#
whole step
skip note

Seem a little complicated? That's because it is, so study if for a while and even return to this in a day or so after your mind has had time to absorb this information.

Remember me saying that the pentatonic scale is a subset of the (minor) diatonic scale? That is because the E-minor pentatonic scale uses only 5 notes of the E-minor diatonic scale. It uses the following notes:

E, G, A, B, D

once again, if a picture is worth a thousand words:

E
F
whole step
skip note
F#
not used by pentatonic
G
G#
whole step
skip note
A
A#
whole step
skip note
B
C
not used by pentatonic
C#
whole step
skip note
D
D#
whole step
skip note


Since this topic is so complicated, I've created yet another pictorial representation of how the scale applies to your flute. You can go   HERE   for a look. When finished, use your browser's   "back"   buttonto return to here.

Note that the 2nd and 6th note of the diatonic minor scale are left out. In music theory terminology, the notes are concidered degrees so you could say that the minor pentatonic scale is a subset of the minor diatonic scale with the the 2nd and 6th degrees left out. NOW... to relate this information to your flute in the key of E. If you cover all of the holes and blow, you will be playing the note E. Uncover the lowest hole and blow, and you will blow the note G. Uncover the third hole and you will play the note A. This pattern will continue. Also note that the spacing between the three lower holes is about the same, as is the spacing between the two upper holes. Note that the spacing between the end of the flute and the lowest hole and the spacing between the 3rd hole from the end and the 4th hole from the end is much larger. This is because of the two notes that are missing in the Pentatonic scale.

OKAY - Now back to the discussion of which Keys will sound good with your key. Any key that is 3 or 5 degrees (of it's base minor scale) above or below your key will sound OK. Remember above that I said degree is the same as the notes of your particular (base) scale which in the key of E would be the E-minor scale. So a flute in the key of G or B would play well with your flute. If you all play together with the same holes covered, you would create what is known as a chord which would be very pleasing to the ear. If there are three flutes playing together with the degree spacing mentioned above, it would also sound best if the flute of the lowest sound play only the first note of each bar. All of the flutes should play this first note, which means that each bar or measure would begin with a chord. The two higher flutes should play the rest of the notes in the bar, or the highest flute could even play some extra notes that are higher than the middle flute. I'll discuss what notes would sound best, later in the lesson.

That's enough of a discussion of this topic for now. If you've followed along and understand all of this, you've done extremely well, as much of this is very complicated.


back to where you were


Playing a .wav file

Please note that whenever you click on the link to play a .wav file within this lesson, that it will take a while for the file to be transferred to your computer. If using certain browsers, a separate little window will open that will just sit there for a while looking like nothing is happening. However the data is actually being transferred to your computer in the background and will eventually start to play. Patience is required, especially for the larger files which could take 5 minutes or longer to transfer. The smaller ones usually do so in a couple of minutes depending on the speed of your modem. Other browsers will ask you if you want to save the file to your computer. If you answer yes, it will be transferred, and then you can click on the file and it will play in your computer's media player.

If your browser displays a little window to play the .wav file, you can still save the file to your computer's hard-disk for playing later. To do that, all you have to do is right-click within the window that has the playing controls. If in Windows, a drop-down menu will appear with an option to save the file. Use the normal file saving process common to this type of Windows menu.
back to top


Note "tie" in musical notation

In normal musical notation there is no such thing as one note that would represent the number of beats given to the third note in the first bar. A couple of different notes are required to to indicate the 2-1/2 beats. However the notes are of the same value and there is no break between them, so a "tie" is used to show that the two notes shown are actually to be played as one.
back to where you were